
javascript
자바스크립트란, 웹브라우저에서 많이 사용하는 인터프리터 방식의 객체지향 프로그래밍 언어이다.
자바스크립트는 ECMA스크립트 표준을 따르는 대표적인 웹 기술이다.
인터프리터방식
- src => object . 코딩하는 그대로 오브젝트가 된다.
컴파일방식 (인터프리터의 반대)
- .java=> class (컴파일)
- src => object (컴파일 후 실행)
여기서 object는 실제 실행파일이고, 인터프리터방식은 코딩하는 그대로 나온다고 보면 된다.
스크립트언어 : 매우빠르게 배우고 작성하기 위해 고안됨. 짧은 소스코드 파일이나 REPL(Read Eval Print Loop)로 상호작용
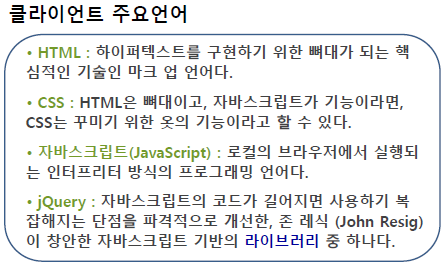
클라이언트 사이드 스크립트 (사용자 컴퓨터에서 처리)
- Javascript, VBscript, Jscript
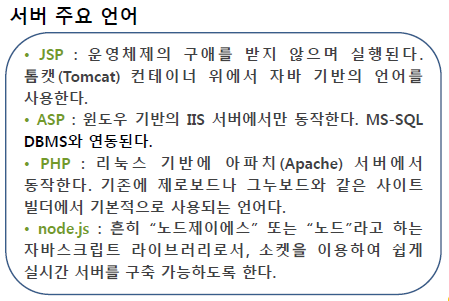
서버사이드 스크립트 (정보를 제공하는 서버쪽 컴퓨터에서 처리되는 스크립트)
- ASP, PHP,JSP, 파이썬, Node.js 등
기본 작성법
작성법에는 세가지가 있다.
- html태그의 inline 이벤트 속성에 작성
- 내부 script태그 - head태그안, body종료 태그 전에 작성
- 외부 script태그 - 현재 페이지에서 외부에 작성한 태그를 load
- html태그의 inline이벤트 속성에서 작성하기
<body>
  <h1>Javascript</h1>
  <ol>
    <li onclick="alert('안녕');">html태그의 inline 이벤트속성에 작성</li>
</ol>다음과 같이 작성하면 되고, 크롬에서 F12를 눌러 Console에서 브라우저 개발자 도구를 확인할 수 있다.
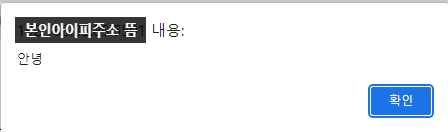
클릭시 알림창으로 안녕이 출력
되는것을 확인할 수 있다.
2. 내부 script태그 - head태그안, body종료 태그 전에 작성
3. 외부 script태그 - 현재 페이지에서 외부에 작성한 태그를 load
head부분
  <script src="js/main.js"></script>
  <script>
  abc(); // main.js 선언된 함수 호출!

  // 한줄 주석
  /*
    여러줄 주석
  */
  console.log('123'); // 브라우져가 문서를 해석하면서 바로 실행!

  // 함수선언
  function foo(){
    console.log("foooooooooooooooooooooooooo");
  }
foo(); // 함수 호출body부분
  <script>
  console.log(456);
  foo();

  function bar(){
    console.log("baaaaaaaaaaaaaaaaaaaaaaaaaaaar");
}main.js파일
// 스크립트 영역

function abc (){
  console.log("abccccccccccccccccccccccccc");
}

console.log("main.js 실행.....................");
java와 마찬가지로 한줄주석은 //, 여러줄 주석은 /* */를 이용한다.
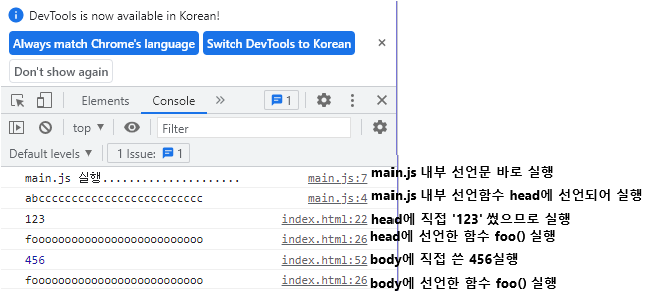
다음과 같이 실행된다.
아래 body에 선언된 bar를 head에서 선언하면 어떻게 될까?
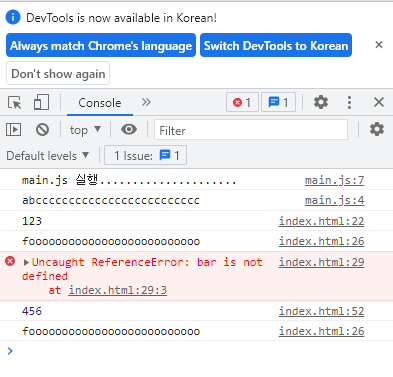
다음과 같이 오류가 발생한다.
javascript는 오류가 발생시, 하위 코드가 전부 실행되지 않으므로 주의해야한다!
javascript는 위에서 아래로 코드를 실행하기 때문에 함수 선언 순서도 주의해야한다!
자료형
Dynamic Typing - javascript는 유동적인 언어로, 대입된 값에 따라 변수의 자료형이 결정된다.
변수 선언시 let 키워드를 사용
상수 선언시 const 키워드를 사용
<button onclick="test1();">Dynamic Typing</button> function test1(){
let k; // 변수 선언
k = 123; // 값대입
console.log(typeof k, k); // number 123
k = "안녕";
console.log(typeof k, k); // string 안녕
}

다음과 같이 변수를 선언했을 때, k값에 따라 변수의 종류가 다르게 나오는 것을 확인할 수 있다.
<button onclick="test2();">자료형</button> function test2(){
// string
// const s; // 'const' declarations must be initialized.
// s = 'heyhey';
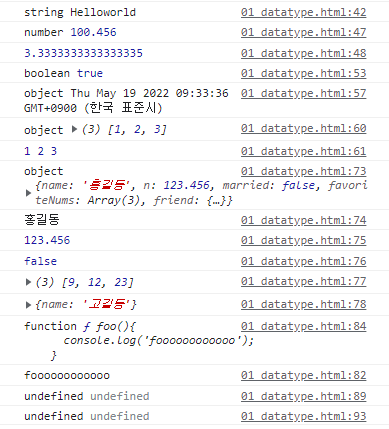
const s = "Helloworld"; // 홑따옴표/쌍따옴표 가능 /변경되지않는 자료형
// s = "Byebyeworld"; // Uncaught TypeError: Assignment to constant variable.
console.log(typeof s, s);
// number
// 정수/실수 구분하지 않는다.
const a = 100.456;
console.log(typeof a, a);
console.log(10 / 3); // 3.3333333333333335
// boolean
// true, false
const bool = !false;
console.log(typeof bool, bool);
// object
const today = new Date(); // 생성자함수 호출 객체 생성
console.log(typeof today, today);
const arr = [1, 2, 3]; // 배열 -> 객체
console.log(typeof arr, arr);
console.log(arr[0], arr[1], arr[2]);
// 요소(속성명:속성값) - 리터럴로 객체생성
const obj = {
name : '홍길동',
n : 123.456,
married : false,
favoriteNums : [9, 12, 23],
friend : {
name : '고길동'
}
};
console.log(typeof obj, obj); // object {name: '홍길동', n: 123.456, married: false, favoriteNums: Array(3)}
console.log(obj.name);
console.log(obj.n);
console.log(obj.married);
console.log(obj.favoriteNums);
console.log(obj.friend);
// function
function foo(){
console.log('foooooooooooo');
}
console.log(typeof foo, foo);
foo();
// undefined
let k;
console.log(typeof k, k); // undefined undefined
let m = '안녕하세요';
m = undefined;
console.log(typeof m, m); // undefined undefined
}
자료형종류
- string
- number
- boolean
- object
- function
- undefined
가 있다.
string
- const 변수명='변수내용' 또는 const 변수명 = "변수내용"
홑따옴표 ' ' 는 변경 가능한 자료형이고, 쌍따옴표 " "는 변경 불가능한 자료형이다.
number
- const 변수명 = 숫자
정수와 실수를 구분하지 않는다. 전부 number형으로 나온다.
boolean
- const 변수명 = true / false (! 사용가능)
object
- const 변수명 = new ___();
생성자 함수를 호출하는 객체 생성이 가능하다.
예시에서는 new Date();를 써서 현재 시각을 호출했다.
- const 변수명 = [ _, _, _ ] ;
배열을 객체로도 만들 수 있다.
- const 변수명 = { 속성명 : 속성값, 속성명: 속성값 , .... }
요소를 리터럴로 객체를 생성할 수 있다.
object안의 object가 가능하다.
function
- function 함수이름(){ 호출내용; }
함수를 만들어 호출할 수 있다.
undefined
- let 변수명; 또는 let 변수명 = 값; 변수명 = undefined; 로 설정.
타입이 undefined로 나오고 값도 undefined로 나온다.
제어문
if / switch / for / while에 대해 배워보자.
if문
<button onclick="test1();">if</button>
  function test1(){
    const n = Math.floor(Math.random() * 10 + 1); // 1 ~ 10 사이의 임의의 정수
    console.log(n);
    if(n % 2 == 0){
      console.log("짝수");
    }
    else {
      console.log("홀수");
    }
}- if
- if else
- if else if
이렇게 세가지가 존재한다.
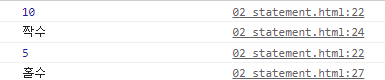
랜덤으로 등장하는 것을 확인할 수 있다.
switch문
<button onclick="test2();">switch</button>
  function test2(){
    const n = prompt("1 ~ 3사이의 정수를 입력하세요"); // string을 반환
    switch(n){
      case "1" : console.log('1을 입력하셨습니다.'); break;
      case "2" : console.log('2을 입력하셨습니다.'); break;
      case "3" : console.log('3을 입력하셨습니다.'); break;
      default : console.log('잘못 입력하셨습니다.');
    }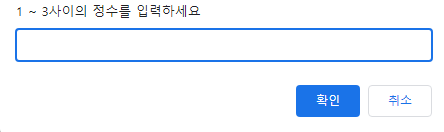
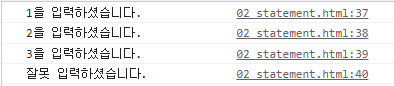
1, 2, 3, 7을 창에 입력해보았더니 다음과 같이 나왔다.
for문
<button onclick="test3();">for</button>
  function test3(){
    // for(let i = 0; i < 10; i++){
    //   console.log(i);
    // }

    // js에는 for..each문은 존재하지않는다.
    const arr = ['a', 'b', 'c'];

    // for..in - Enumerable속성이 true인 속성을 순회
    // 배열 사용시 index를 참조
    for(let i in arr){
      console.log(i, arr[i]); // index
    }

    // for..of - 해당객체가 iterator속성을 가지고 있는 경우 사용가능
    // 배열 사용시 요소를 참조
    for(let ch of arr){
      console.log(ch);
    }
}for each문 존재 x
for (let A in B ) { } : B에 대한 Enumerable 속성이 true인 속성을 A로 순회
for (let A of B ) { } : B객체가 iterator속성을 가지고 있는 경우 사용이 가능하다.
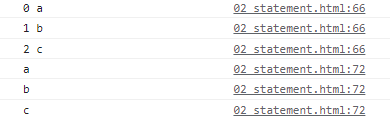
실행시, let in은 배열 번호와 요소가 같이나오고 let of 는 요소만 나온다.
while문
<button onclick="test4();">while</button>
function test4(){
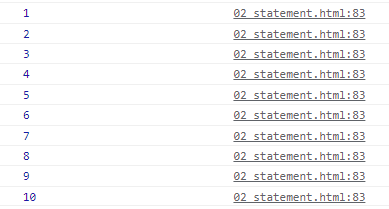
let i = 1;
while(i <= 10){
console.log(i++); // 후위증감연산 - 인접연산처리후 증감
}
let yn;
do {
yn = prompt("계속 하시겠습니까? (y/n)", 'y');
} while(yn == 'y');
}
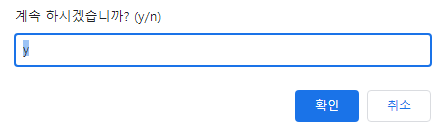
y입력시 while문이 계속 실행된다. (한번만 출력)
n입력시 while문 종료.
실습문제 구구단
/**
* @실습문제 - 구구단
* - 사용자 입력한 단수(2 ~ 9)의 구구단을 출력
* - 2 ~ 9사이의 숫자가 아닌 경우는 출력하지 않는다.
* - gugudan함수를 호출해서 출력할것
*/
function test5(){
// number타입으로 명시적 형변환 "2" -> 2
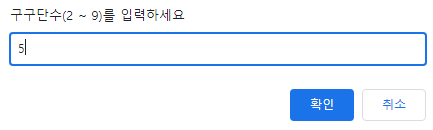
const dan = Number(prompt("구구단수(2 ~ 9)를 입력하세요", 2));
if(dan >= 2 && dan <= 9)
gugudan(dan);
}
/**
* 매개변수 dan의 타입은 호출시 매개인자에 따라 결정된다. (Dynamic Typing)
*/
function gugudan(dan){
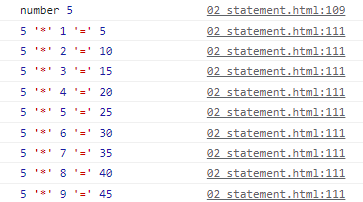
console.log(typeof dan, dan); // string 2
for(let i = 1; i < 10; i++)
console.log(dan, "*", i, "=", dan * i);
}
DOM접근
DOM : Document Object Model
- document객체 하위에 html문서의 태그가 가진 계층구조 그대로 javascript객체로 변환해 관리
- 각각의 tag는 객체 (속성)로써 관리된다.
<div>
<ul>
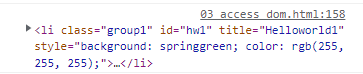
<li class="group1" id="hw1" title="Helloworld1">Helloworld1</li>
<li class="group1" id="hw2">Helloworld2</li>
<li class="group2" id="hw3" title="Helloworld3">Helloworld3</li>
<li class="group2" id="hw4">Helloworld4</li>
<li class="group1 group2" id="hw5">Helloworld5</li>
</ul>
</div>
<div>
<!-- (input:checkbox[name=fruit]#fruit$+label[for=fruit$])*3 -->
<input type="checkbox" name="fruit" id="fruit1" value="사과"><label for="fruit1">사과</label>
<input type="checkbox" name="fruit" id="fruit2" value="바나나"><label for="fruit2">바나나</label>
<input type="checkbox" name="fruit" id="fruit3" value="아보카도"><label for="fruit3">아보카도</label>
<input type="checkbox" id="fruitCheckAll" onchange="test5();"><label for="fruitCheckAll">모두 선택/해제</label>
<br>
<input type="text" id="username" name="username" placeholder="username">
<br>
<input type="range" name="point" id="point" min="0" max="100" value="0" oninput="test7();">
<span id="pointView">0</span>점
</div>
  <button onclick="test1()">getElementById</button>
  <button onclick="test2()">getElementsByTagName</button>
  <button onclick="test3()">getElementsByClassName</button>
  <button onclick="test4()">getElementsByName</button>
  <button onclick="test6()">@실습문제 - #username 값출력</button>
  <br>
  <button onclick="test8();">querySelector</button>
  <button onclick="test9();">querySelectorAll</button>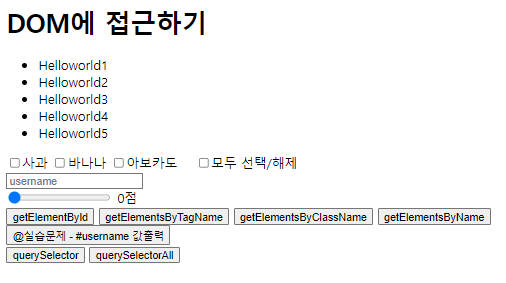
  /**
   * getElementById
   */
  function test1(){
    console.dir(document); // 객체를 계층형으로 열람
    const hw3 = document.getElementById("hw3");
    console.dir(hw3);

    console.log(hw3.style.color); // getter ""
    hw3.style.color = 'hotpink'; // setter
    console.log(hw3.style.color); // getter hotpink

    const noElem = document.getElementById("alkfjasldfj");
    console.log(typeof noElem, noElem); // object null
  }
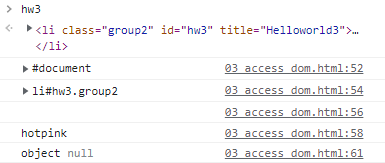
getElementId 버튼 클릭시 hw3에 대한 객체에 접근한 값이 나오고,
id=h3만 핫핑크 색으로 바뀌었다.
console.dir(document)를 이용해서 객체를 열람할 수 있다.
  /**
   * getElementsByTagName
   */
  function test2(){
    const list = document.getElementsByTagName("li");
    // console.log(list);

    for(let i = 0; i < list.length; i++){
      // console.log(list[i]);
      list[i].style.background = 'springgreen';
      list[i].style.color = '#fff'; // 컬러명, rgb함수, 16진수 모두 작성가능
    }
  }
getElementByTagName 클릭시 li를 가진 객체의 배경색이 springgreen으로, 글씨는 흰색으로 바뀌었다.
/**
* getElementsByClassName
*/
function test3(){
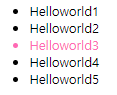
const group1 = document.getElementsByClassName("group1");
console.log(group1);
for(let i = 0; i < group1.length; i++){
const li = group1[i];
const content = li.innerHTML;
li.innerHTML = content.replace('Helloworld','안녕세계');
}
}

getElementByClassName 클릭시 HelloWorld중 group1만 안녕세계로 바뀌었다.

이때, getElementByTagName을 클릭한 상태에서 getElementByClassName을 클릭하면, 위에 적용된 것도 그대로 적용된다. 콘솔창이 초기화되지 않기 때문이다.
  /**
   * getElementsByName
   */
  function test4(){
    const fruits = document.getElementsByName("fruit");
    console.log(fruits);
    // 체크된 요소의 값 출력하기
    const arr = [];
    for(let i = 0; i < fruits.length; i++){
      const chk = fruits[i];
      console.dir(chk);
      if(chk.checked){
        arr.push(chk.value); // 배열의 마지막 요소로 추가하기
      }
    }
    console.log(arr);
    alert(arr + "을 선택하셨습니다."); // 바나나,아보카도을 선택하셨습니다.
  }
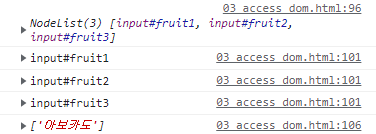
아보카도를 선택 시, 다음과 같은 알람창이 뜨고, 콘솔창에는 위와 같이 나오게 된다.
  /**
   * 전체선택/해제
   */
  function test5(){
    const fruitCheckAll = document.getElementById("fruitCheckAll");
    // console.log(fruitCheckAll.checked);

    const fruits = document.getElementsByName("fruit");
    for(let i = 0; i < fruits.length; i++)
      fruits[i].checked = fruitCheckAll.checked;
}전체선택을 하는 함수를 만들었다. onchange 요소를 이용해서 불러주면 된다.
  /**
   * getElementById
   * getElementsByName
   */
  function test6(){
    // const username = document.getElementById("username");
    const username = document.getElementsByName("username")[0];
    console.log(username);
    alert(username.value);
    username.value = ''; // 초기화
  }


춘딩을 입력하고 @실습문제-# username값출력을 누르면 다음과 같이 뜬다.
  /**
   * input:range 값 시각화하기
   *
   * document.getElementById에 한해서 id와 동일한 이름의 변수를 선언없이 해당객체에 접근할 수 있다.
   */
  function test7(){
    // const point = document.getElementById("point");
    // console.log(point.value);
    // const pointView = document.getElementById("pointView");
    pointView.innerHTML = point.value;
  }


포인트를 시각화하는 함수를 만들었다. 스크롤시 점수가 같이 뜬다.
  /**
   * querySelector
   * - css선택자를 사용해서 하나의 요소만 반환
   */
  function test8(){
    // const username = document.querySelector("#username");
    // console.log(username);

    // const group1 = document.querySelector(".group1");
    // console.log(group1);

    const li = document.querySelector("ul li");
    console.log(li);
  }
querySelector를 선택시, css의 선택자를 이용하여 ul li에 해당하는 값을 불러냈다.
  /**
   * querySelectorAll
   * - css선택자와 매칭되는 요소를 모두 배열에 담아 반환
   */
  function test9(){
    const group1 = document.querySelectorAll(".group1");
    console.log(group1);

    const list = document.querySelectorAll("ul li");
    console.log(list);
  }

querySelectorAll 을 통해서 .group1의 요소와, ul li요소를 전부 불러냈다.