객체배열 - 리터럴
[{},{},{}] 이런 형태로 관리할 때 사용한다.
    const test1=()=>{
        const pets=[];
        pets.push({
            name:'구리구리',
            breed: '푸들',
            weight: 3,
            age: 10,
            color:['white'],
            bark(){
                console.log(this.weight);
                return this.weight< 10?'왈왈':'멍멍';
            }
        })
        pets.push({
            name:'둘리',
            breed: '말티즈',
            weight: 6,
            age: 5,
            color:['white'],
            bark(){
                console.log(this.weight);
                return this.weight< 10?'왈왈':'멍멍';
            }
        })
        pets.push({
            name:'사랑이',
            breed: '코카스파니엘',
            weight: 13,
            age: 3,
            color:['white','brown'],
            bark(){
                console.log(this.weight);
                return this.weight< 10?'왈왈':'멍멍';
            }
        })
        console.log(pets);

        // 반복처리 : 둘리야 ~ 왈왈/멍멍
        pets.forEach((pet)=>{
            const{name,bark}=pet;
            //method를 구조분해할당하면 this를 잃어버린다.
            console.log(`${pet.name}야~ ${bark.call(pet)}`);//this를 pet으로 binding해서 bark호출!
        });
    };
pets를 출력하면 pets의 모든 객체들이 출력되는 것을 확인할 수 있다.
name과 bark도 아래 써진 방법으로 출력이 가능하다.
10키로가 넘는지 안넘는지에 따라 왈왈,멍멍이 다르게 출력되는 것을 확인할 수 있다.
객체배열 - 생성자함수
    const test2=()=>{
        const pets=[];
        pets.push(new Pet('구리구리','푸들',3,10,'white'));
        pets.push(new Pet('둘리','말티즈',6,5,'white'));
        pets.push(new Pet('사랑이','코카스파니엘',13,3,'white','brown'));
        console.log(pets);
        pets.forEach((pet)=>{
            const{name,bark}=pet;
            console.log(`${pet.name}야~ ${bark.call(pet)}`);
        });

};생성자함수
- 관례상 대문자로 시작하는 이름을 가진다.
- new 연산자를 통해 호출되고, 객체를 생성한다.
- this용법 6. 생성자함수안의 this는 현재 객체를 가르킨다.
- 화살표함수는 생성자함수로 사용할 수 없다.
    function Pet(name,breed, weight,age, ...color){
        this.name=name;
        this.breed=breed;
        this.weight=weight;
        this.age=age;
        this.color=color;
        // this.bark=function(){
        //     return this.weight<10?'왈왈':'멍멍';
        // };
    };

    Pet.prototype.bark=function(){
        return this.weight<10?'왈왈':'멍멍';
}다음과 같이 생성자함수를 만들었다.

객체로 push하여 더 짧고 간결한 코드로 프린트 할 수 있다.
생성자함수 - 프로토타입
- javascript는 프로토타입 기반의 상속모델을 가진 객체지향 언어이다.
- 생성자함수 호출로 생성된 객체는 프로토타입과 연결된 프로토타입체인을 갖는다.
- 프로토타입체인 최상위에는 Object.prototype이 존재한다.
    const test3 = () =>{
        console.log(Duck);//생성자함수
        console.log(Duck.prototype);//프로토타입

        console.log(Duck.prototype.constructor==Duck); //true
        //duck을 만들면 duck.prototype이 자동으로 생김

        const lee=new Duck('이','오리'); //duck객체
        console.log(lee);

        lee.say();//Duck.prototype.say 호출
        console.log(lee.toString());//[object Object]
        console.log(`${lee}`); //[object Object]

        console.log(lee.__proto__);//Duck.prototype
        console.log(lee.__proto__===Duck.prototype);//true

        //생성자함수는 new연산자와 함께 호출해야한다.
        const donald = Duck('Donald','Trump');
        console.log(donald);//undefined
        console.log(this.firstName);//Donald
        console.log(this.lastName);//Trump
    };

    function Duck(firstName,lastName){
        this.firstName=firstName;
        this.lastName=lastName;
    }
    Duck.prototype.say=function(){
        console.log(`안녕하세요, ${this.firstName} ${this.lastName}입니다.`);
    }
duck을 만들면 duck.prototype은 자동으로 생긴다.
say로 duck을 호출한다.
생성자함수는 new연산자와 함께 호출해야한다.
프린트하면 다음과 같이 프린트된다.
속성비교
- 생성자함수 속성
- 프로토타입 속성
- 생성객체 속성
    const test4=()=>{
        const a= new A();

        console.dir(A);
        console.dir(A.prototype);
        console.log(a);

        //생성객체속성
        console.log(a.username);//알 파치노
        a.hello(); //안녕 알파치노

        //생성자함수 속성(static)
        console.log(A.username);//홍길동
        A.hello();//안녕 홍길동
    };
    /**
     * 생성자함수
     */
    function A(){
         this.username='알 파치노';
         this.hello=function(){
             console.log('안녕 알파치노');
         };
    }

    /**
     * 생성자함수 속성(=static자원)
     */
    A.username='홍길동';
    A.hello=function(){
        console.log('안녕 홍길동');
    }
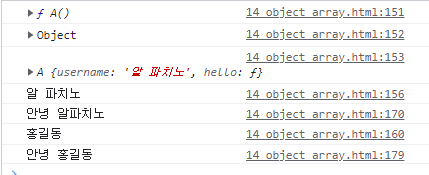
a로 불러내면 알파치노(생성자 함수)가, A로 불러내면 홍길동(생성자함수 속성=static)이 출력된다.
    const test4=()=>{
        const a= new A();

        console.dir(A);
        console.dir(A.prototype);
        console.log(a);

        //생성객체속성
        console.log(a.username);
        a.hello();

        //생성자함수 속성(static)
        console.log(A.username);//홍길동
        A.hello();//안녕 홍길동
    };

    /**
     * 생성자함수 속성(=static자원)
     */
    A.username='홍길동';
    A.hello=function(){
        console.log('안녕 홍길동');
    }
    /**
     * 프로토타입 속성
     */
    A.prototype.username='아이언맨';
    A.prototype.hello=function(){
        console.log('안녕 아이언맨');
    };
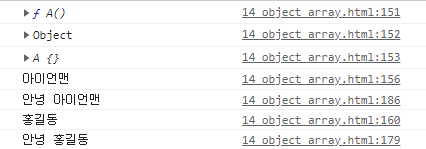
생성자함수를 지우고, 프로토타입 속성을 출력하면 생성객체속성에서 알파치노(생성자함수) 대신 프로토타입 속성이 프린트된다.
상속
    const test1=()=>{
        const books=[
            new Book('매트릭스',35000,.15),
            new Book('오라클 완전정복',30000,.2),
            new Book('네오클래식',15000),
            new Comic('원피스',3000, 0, false),
            new Comic('드래곤볼',2500,0.1,true),
        ];
        console.log(books);
        books.forEach((book)=>console.log(`${book}`));
    };

    function Book(title,price,discountRate=0.05){
        this.title=title;
        this.price=price;
        this.discountRate=discountRate;
    }
    Book.prototype.getSalePrice = function(){
        return this.price-(this.price*this.discountRate);
    };
    Book.prototype.toString=function(){
        return `제목 : ${this.title}, 판매가 : ${this.getSalePrice()}원 (정가 : ${this.price}원)`;
};다음과 같은 books 가 존재할 때, Comic은 상속을 받은 자식 객체이다.
    function Novel(title,price,discountRate,type){
        //1. 부모생성자함수 호출
        Book.call(this,title,price,discountRate);
        //Book.apply(this,title,price,discountRate); //this사용가능
        //부모생성자함수에서 처리할 수 없는 속성 등록
        this.type=type;
    }
    //2. 자식생성자함수의 프로토타입객체를 부모프로토타입객체 복제본으로 지정
    Novel.prototype=Object.create(Book.prototype);
    //3. 2번에서 생성된 프로토타입객체의 constructor속성으로 자식생성자함수를 재지정
    Novel.prototype.constructor=Novel;
    function Comic(title,price,discountRate,finished){
        Book.call(this,title,price,discountRate);
        this.finished=finished;
    }
    Comic.prototype = Object.create(Book.prototype);//new 생성자함수호출 없이 Book객체 생성
    Comic.prototype.constructor=Comic;
    Comic.prototype.toString=function(){
        return `[${this.finished ? '완결' : '연재중'}] ${Book.prototype.toString.call(this)}`;
    }
자식 생성자함수 & 프로토타입 처리 하는 방법은 다음과 같다.
- 자식 생성자함수 안에서 부모 생성자 함수를 호출한다(super())
- 자식 생성자함수의 프로토타입 객체를 부모 프로토타입 객체의 복제본으로 지정한다.
- 2번에서 생성된 프로토타입의 객체를 constroctor속성으로 자식 생성자함수를 재지정한다.
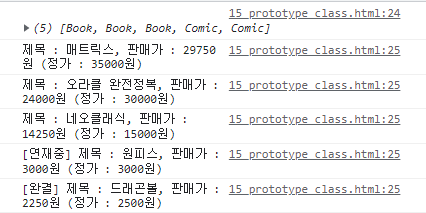
위에서 방법에 따라 순서대로 처리를 하고, 프린트 한 결과 Book에 대한 프린트와 Comic에 대한 프린트 (연재여부 추가) 가 제대로 이루어졌음을 알 수 있다.
call | apply | bind
- this binding과 관련한 함수
- this를 binding해서 호출
- call(this객체, arg1, arg2, ...) - 함수의 매개인자를 나열
- apply(this객체, [arg1, arg2, ...]) - 함수의 매개인자를 배열로 전달
* 화살표함수는 this 재지정이 불가능하다
- this가 binding된 함수를 리턴한다. : bind
    const test2=()=>{
        const foo=function(a,b){
            console.log(this, this.id,a,b);//this는 window를 가르킴.
        }
        foo(10,20); //undefined 10 20

        const obj={
            id:'qwerty1234'
        };
        foo.call(obj,10,20); //{id:'qwerty1234'} 'qwerty1234' 10 20
        foo.apply(obj,[10,20]);//{id:'qwerty1234'} 'qwerty1234' 10 20

        const foooooo=foo.bind(obj);
        foooooo(10,20);
    };

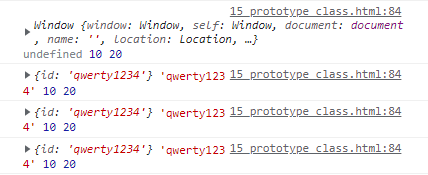
call과 apply는 같은 역할을 하고, fooooo와도 같은 값이 나왔음을 알 수 있다.
Object.create
생성자 호출 없이 해당객체를 생성하는 메소드 (Object생성자함수의 static메소드)
    const test3=()=>{
        //1. room객체 - Room.prototype을 부모객체로 하는 객체생성. 생성자함수 호출(속성추가)
        const room1 = new Room(1);
        console.log(room1);

        //2. Object.create(Room.prototype) - Room.prototype의 자식객체 생성
        const room2 = Object.create(Room.prototype);
        console.log(room2);

        console.log(room1.__proto__ === Room.prototype);//true
        console.log(room2.__proto__===Room.prototype);//true


    };

    function Room (no) {
        this.no=no;
    }
Class
생성자함수와 상속관계를 문법적으로 쉽게 표현
생성자함수의 Syntactic Sugar(문법적 설탕)
class는 동일한 이름의 생성자함수를 선언한다.
new 연산자를 통해 생성자함수를 호출하면 constructor가 호출된다.
클래스 내에 선언된 메소드(메소드 단축문법)는 prototype에 작성이 된다.
클래스 내에 선언한 속성은 현재 객체의 속성이 된다.
static키워드를 사용하면 생성자함수의 속성으로 등록할 수 있다.
    class Person{
        constructor(name,phone){
            this.name=name;
            this.phone=phone;
        }
        //현재객체 속성지정
        x=10;

        //생성자함수 속성지정
        static y=20;
        static z(){
            console.log('zzzzzzzzzzzzzzz');
        }

        //prototype 속성 - 메소드단축문법
        sayHi(){
            console.log(`안녕하세요, 저는 ${this.name}입니다.`);
        }
    };
    class Dev extends Person{//2,3번해결
        constructor(name,phone,lang){
            super(name,phone);//1번 해결
            this.lang=lang;
        }

        //Dev.prototype
        sayHi(){
            super.sayHi(); //프로토타입체 인 상의 부모메소드
            console.log(`저는 ${this.lang}개발자입니다.`);
        }
}; const test4=()=>{
const honggd = new Person('홍길동','01012341234');
console.log(honggd);
console.log(typeof Person,Person); //function 생성자함수
honggd.sayHi();
console.log(Person.y);//static속성
Person.z();
};
const test5=()=> {
const sinsa = new Dev('신사임당','01012344321','Javascript');
console.log(sinsa);
sinsa.sayHi();
};

test4에서는 Person이 함수형이고, 어떤 형태를 가지는지 나온다.
그리고 prototype 속성이 출력되고, static 속성도 출력되고, static 함수도 출력된다. (static속성과 함수는 생성자함수속성)
test5에서는 Person을 물려받은 Dev에 대한 출력이 나온다.
Dev에서 super()로 부모객체에 존재하는 내용을 담고, lang을 추가한다.
Dev의 프로토타입 sayHi도 super로 부모객체에 존재하는 함수를 가져올 수 있고, 새로 출력도 가능하다.
이 내용이 test5에 제대로 출력되었음을 확인할 수 있다.
