window객체
웹페이지의 모든 자원을 관리하는 객체
BOM (Browser Object Model)
navigator, location, history, screen, XMLHttpRequest, frames ...
DOM (Document Object Model)
document (html로 부터 변환된 객체)
Javascript (Object, String, Array, ...)
오늘은 이렇게 배워봤다.
window 객체
웹페이지의 모든 자원을 관리하는 객체 (최상위)
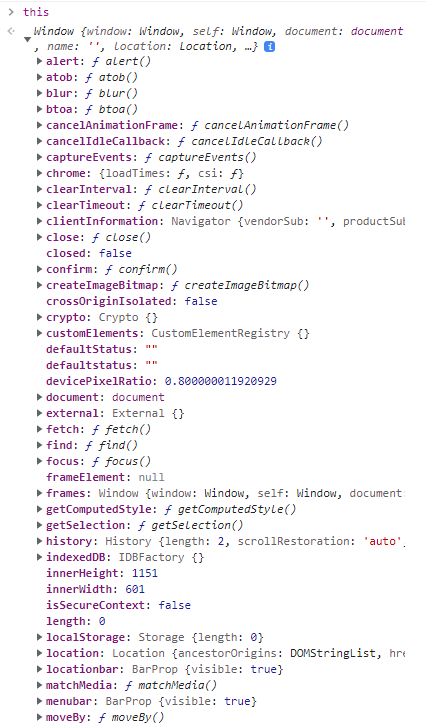
F12콘솔창에 this를 검색하면, 다음과 같이 window 가 가진 객체들이 뜬다.
그외에도 window.Object , window.Array, window.String 등등 검색이 가능하다.
window객체는 페이지에 대한 관리로, 크롬 탭이 여러개일 경우 window객체도 여러개라고 봐야 한다.
window객체의 메소드들을 알아보자.
open
- 새 탭 또는 팝업을 시작하는 메소드
- open(url, target, specs) : window
- target : window 이름 또는 _self
- specs : 팝업크기, 위치 지정
    <button onclick="test1();">open</button>
<button onclick="test2();">close</button> const test1 = () => {
open("index.html");
};다음과 같이 입력하면, 버튼 open을 클릭시 index.html이 새 탭으로 나타난다.
    const test1 = () => {
      open("https://naver.com", "_self");
};다음과 같이 입력하면, open 클릭시 네이버로 가며, 새 탭이 아닌 현재 창에서 띄워진다.
    let newWindow;
    const test1 = () => {
      newWindow = open("index.html", "javascript-index"); // 새 window객체의 name
      console.log(newWindow);
};위와 같이 입력하면, index페이지가 새로 열리고, 그 index페이지의 window객체 이름은 javascript-index가 된다.

콘솔창에 window를 검색해보면 이름이 제대로 설정된 것을 확인할 수 있다.
    let newWindow;
    const test1 = () => {
      newWindow = open("", "popup", "width=300px, heigimage.pnght=300px, left=200px, top=200px");
      console.log(newWindow);
    };
    const test2 = () => {
      newWindow.alert('부모창(opener)에서 보낸 메세지~ '); // non-block | block (newWindow콘솔 open되었을때만!)
      newWindow.close();
}open을 누르면 새 창이 왼쪽에서부터 200px, 위에서부터 200px 아래에 존재하게 뜨는 것을 볼 수 있다.
여기서 기준값은 '모니터의 크기' 이며, 브라우저 바 를 제외하고 창에서만 위치를 계산해서 따진다.
close를 누를 경우 종료가 제대로 된다.
* 여기서 alert는 제대로 작동하지 않았는데, non-block | block에 따라 다르다고 하는데 이해를 하지 못했다 ㅠ
setTimeout (callbackFunction, millis) : id
    <button onclick="test3();">setTimeout</button>
    <button onclick="test4();">clearTimeout</button>
<button onclick="test5();">@실습문제 - 타이머</button> let timeoutId;
const test3 = () => {
timeoutId = setTimeout(() => {
alert('안녕');
}, 3000);
console.log("timeoutId : ", timeoutId);
}; const test4 = () => {
clearTimeout(timeoutId);
console.log(timeoutId + "번 timeout을 취소!");
};3000의 단위는 밀리초로, setTimeout 버튼을 클릭하면 3초뒤에 '안녕'이라는 팝업이 뜬다.
팝업이 뜨기 전에 clearTimeout을 클릭하면 창이 뜨지 않는다.
팝업이 뜬 후에 clearTimeout을 입력하면, console창에 취소 메세지는 뜨지만, 실제로 취소할 수 없다.
팝업 타이머 만들기
사용자부터 타이머메세지와 시간(초)를 입력받아 타이머를 생성해보자.
    const test5 = () => {
      const msg = prompt("타이머 메세지를 입력해주세요~", "밥 먹어라~");
      const sec = prompt("타이머 시간(초)을 입력해주세요~", "3");
      timeoutId = setTimeout(() => {
        alert(msg);
      }, sec * 1000);
    };
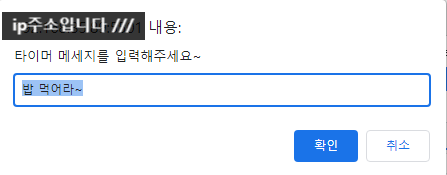

이렇게 입력하면

정확히 3초뒤에 입력한 내용 그대로 팝업이 뜬다.
setInterval(callbackFunction, millis) : intervalId
millis초 후에 millis초 간격으로 callbackFunction 실행
    <h2 id="count"></h2>
    <button onclick="test6();">setInterval</button>
    <button onclick="test7();">clearInterval</button>
<h2 id="clock"></h2> let countNum = 10;
count.innerHTML = countNum;
let intervalId;
const test6 = () => {
intervalId = setInterval(() => {
countNum--;
count.innerHTML = countNum;
}, 1000);
console.log('intervalId :', intervalId);
};
const test7 = () => {
clearInterval(intervalId);
};setInterval 을 실행하면 1초(1000밀리초)에 숫자가 1개씩 줄어든다.
clearInterval을 실행하면 계속 실행되던 setInterval이 멈춘다. (-값이어도 계속 진행됨)
시계만들기
    const clockString = () => {
      const f = (n) => n.toString().padStart(2, "0");
      const now = new Date();
      const yyyy = now.getFullYear();
      const MM = f(now.getMonth() + 1);
      const dd = f(now.getDate());
      const hh = f(now.getHours());
      const mm = f(now.getMinutes());
      const ss = f(now.getSeconds());
      return `${yyyy}/${MM}/${dd} ${hh}:${mm}:${ss}`;
    };
    const displayClock = () => clock.innerHTML = clockString();
    console.log(setInterval(displayClock, 1000));

다음과 같이 실행하면, 현재 시간이 출력된다.
BOM (Browser Object Model)
navigator, location, history, screen, XMLHttpRequest, frames ...
BOM에 종류에는 위와 같은 것들이 있다. 하나하나 알아보자.
navigator
브라우저에 대한 정보를 가진 객체
userAgent
    const test1 = () => {
        console.log(navigator);
        console.log(navigator.userAgent);
        //크롬 : Mozilla/5.0 (Windows NT 10.0; Win64; x64) AppleWebKit/537.36 (KHTML, like Gecko) Chrome/101.0.4951.67 Safari/537.36
        //firefox : Mozilla/5.0 (Windows NT 10.0; Win64; x64; rv:100.0) Gecko/20100101 Firefox/100.0
        //edge : Mozilla/5.0 (Windows NT 10.0; Win64; x64) AppleWebKit/537.36 (KHTML, like Gecko) Chrome/101.0.4951.64 Safari/537.36 Edg/101.0.1210.53
        //웨일 : Mozilla/5.0 (Windows NT 10.0; Win64; x64) AppleWebKit/537.36 (KHTML, like Gecko) Chrome/100.0.4896.151 Whale/3.14.134.62 Safari/537.36
        //사파리 : Mozilla/5.0 (Macintosh; Intel Mac OS X 10_15_7) AppleWebKit/605.1.15 (KHTML, like Gecko) Version/15.4 Safari/605.1.15

}; 
크롬에서 실행하면 다음과 같이 나온다.
이걸로 브라우저가 어떤 기반으로 만들어졌는지 알 수 있다.
location
브라우저 주소표시줄 관련정보를 가진 객체
location.href=" "; 페이지 이동
location.reload(); 새로고침
    const test2 = () => {
    console.log(location);
    const {href, protocol, hostname, port, origin, pathname, search, hash} = location;
    console.log(href, protocol, hostname, port, origin, pathname, search, hash);
    // http://192.168.10.6:5500/03_javascript/17_BOM.html?type=abc&query=%EC%95%88%EB%85%95#qwerty
    // http:
    // 192.168.10.6
    // 5500
    // http://192.168.10.6:5500
    // /03_javascript/17_BOM.html
    // ?type=abc&query=%EC%95%88%EB%85%95
    // #qwerty
  };


    //페이지이동
    const test3=()=> location.href="https://naver.com";
    //새로고침
const test4=()=> location.reload();test2 실행시, 주석과 같은 정보들이 나타나고
test3 실행시 네이버로 페이지가 이동된다.
test4 실행시 새로고침이 진행된다.
history
브라우져 방문기록 관리 객체
history.forward(); : 앞으로가기
history.back(); : 뒤로가기
go(n) : 양수) 제공된 숫자만큼 앞으로가기 / 0) 새로고침 / 음수) 제공된 숫자만큼 뒤로가기
    const test5=()=>{
        console.log(history);
    };
    const test6=()=>history.forward();
    const test7=()=>history.back();


test5실행시 length:3을 볼 수 있는데, 현재페이지, 이전페이지, 이후 페이지 합쳐서 3개라는 것을 의미한다.
test6, 7 실행시 뒤로 갔을때와 앞으로 갔을 때의 length를 확인할 수 있다.
     const test8 = () => {
    const n = prompt("이동한 페이지에 대해 정수로 입력하세요.")
    history.go(n);
}이 역시 n에 대한 값을 입력하면 이동하는 것을 확인할 수 있다.
0 : 새로고침
양수 : 앞으로가기
음수 : 뒤로가기
screen
os에 연결된 모니터(hardware)관련 정보를 가진 객체
<button onclick="test9();">screen</button>
     const test9=()=>{
        console.log(screen);
        const {width,height,availWidth,availHeight,availLeft,availTop}=screen;
        console.log(width,height,availWidth,availHeight,availLeft,availTop);
        //1440
        //900
        //1440
        //860
        //-1440
        //0

        //300px=300px 팝업창을 화면 정가운데 위치시키기
        const left=availLeft+(width-300)/2;
        const top=availTop+(height-300)/2;
        open("","popup",`width=${width}px, height=${height}px, left=${left}px, top=${top}px`);
    };
이렇게 정보가 뜬다. 이를 참고해서 popup을 만들면,
open으로 모니터크기와 똑같은 popup이 뜨게 된다.
DOM (Document Object Model)
document (html로 부터 변환된 객체)
window.document
브라우져가 html문서를 해석해서 document객체 하위에 계층구조로써 html태그객체를 관리한다.
document.getElementByXXX, document.querySelectorXXX 메소드는 모두 DOM에서 검색하게 된다.
Node.prototype, Element.prototype등을 상속하고 있다.
Node계열
- TextNode
- CommentNode
Element계열
- 모든 Tag(Element) 객체
    <div id="sample">
        <span>Hello</span>
        <!--Hello는 한국어로 안녕입니다. -->
    </div>
    <button onclick="test1();">#sample</button>
    <button onclick="test2();">Element-textNode</button>
    <button onclick="test3();">Element</button>
    const test1 = () =>{
        console.log(sample);
        console.dir(sample);
    };

    const test2=()=> {
        const h2=document.createElement("h2");
        const content = document.createTextNode("안녕하세요");
        h2.appendChild(content);//각자 만든 후 합친것 . 이 줄 선언전까지는 합쳐지지 않음.
        document.body.appendChild(h2); //body의 자식요소로 맨 마지막 DOM에 추가
        //이벤트핸들러를 바로 등록 가능.
        h2.click=()=>{alert("ㅋㅋㅋㅋ")};

        document.body.innerHTML+="<h2>안녕하세요</h2>";
    };

    const test3=()=>{
        const img=document.createElement("img");
        img.src="../sample/image/hyunta.jpg";
        img.style='width:300px; margin:10px; border-radius:50%;';
        document.body.append(img);
    };

test1의 경우 sample에 대한 코드, sample에 대한 구성요소가 나온다.

test2의 경우, textNode로 "안녕하세요"와 createElement로 h2를 만들고, 이를 합친다.
출력시 위와 같이 나오게 된다.

test3의 경우, textNode없이 img element를 생성했다.
요소제거
자식속성
- Node속성 : firstChild | lastChild | childNodes
- Element속성 : firstElementChild | lastElementChild | children
형제속성
- Node속성 : nextSibling | previousSibling
- Element속성 : nextElementSibling | previousElementSibling
부모요소
- Node속성 : parentNode
- Element : parentElement
자식요소
    <button onclick="test4();">자식요소제거</button>
    <button onclick="test5();">요소제거</button>
    <button onclick="test6();">형제요소</button>
    <button onclick="test7();">부모요소</button>
    <button onclick="test8();">@실습문제 - textNode변경하기</button>


    <div id="foo">
        <p id="p1">안녕1</p>
        <p id="p2">안녕2</p>
        <p id="p3">안녕3</p>
        <p id="p4">안녕4</p>
        <p id="p5">안녕5</p>
</div> const test4=()=>{
console.dir(foo);
console.log(foo.firstChild);
console.log(foo.firstElementChild);
console.log(foo.lastChild);
console.log(foo.lastElementChild);
console.log(foo.childNodes);//[text, p, text, p, text, p, text, p, text, p, text]
console.log(foo.children);//[p, p, p, p, p]
// foo.removeChild(foo.firstChild);//textNode제거
console.log(foo.removeChild(foo.firstElementChild)); //p제거후 반환
//모든 자식요소 제거
while(foo.firstChild){
foo.removeChild(foo.firstChild);
}
};
test4클릭시 자식요소가 제거되므로, 안녕1,2,3,4,5 가 모두 삭제된다.


foo => 함수 출력
foo.firstChild => foo의 첫번째 요소 #text 출력
foo.firstElementChild =>foo의 첫번째 요소 내용 <p id="p1">안녕1</p> 출력
foo.lastChild => foo의 마지막 요소 #text 출력
foo.lastElementChild =>foo의 마지막 요소 내용 <p id="p5">안녕5</p> 출력
foo.ChildNodes => text, p#p1, text, p#p2 ... 출력
foo.children => 자식요소의 p태그와, 요소별로 p태그 값이 출력
foo.removeChild(foo.firstElementChild) => 첫번째요소 제거 후 값 반환
const test5=()=>foo.remove();
태그 자신이 직접 제거된다.
형제속성
    const test6=()=>{
        console.log(foo.childNodes);
        // const node = p3.nextSibling.nextSibling;//textNode-p#p4
        // const node=p3.previousSibling.nextSibling;//textNode-p#p2
        // const node = p3.nextElementSibling; // p#p4
        const node = p3.previousElementSibling;//p#p2
        console.log(node);
        node.style.color='red';//textNode에는 style속성이 없다.
    }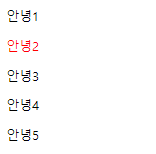
p3태그의 previousElement인 p2태그만 빨간색으로 변하였다.
부모속성
    const test7=()=>{
        const node =p3.parentNode;
        // const node=p3.parentElement;
        node.style.color="blue";
        console.log(node);
    };
p3태그의 부모요소 (p태그 전체)가 파란색으로 변하였다.
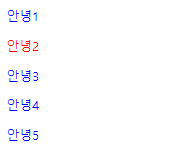
부모요소(test7)클릭 후, 자식요소( test6) 클릭시 (혹은 순서 반대) 위와 같이 나온다.
부모요소와 자식요소설정은 동시에 적용될 수 있다.
@실습문제 - textNode변경하기
- #p2 컬러 pink
- #p5 컬러 tomato
- 부모요소를 찾아 background-color를 지정
- 자식요소의 textNode를 hello1,Hello2, ... 로 변경하기
    const test8=()=>{
        p3.previousElementSibling.style.color="hotpink";
        p3.nextElementSibling.nextElementSibling.style.color="tomato";
        p3.parentElement.style.backgroundColor="beige";
        console.log(p3.parentElement.children);//유사배열
        [...p3.parentElement.children].forEach((p,index)=>{
            const content = document.createTextNode('Hello'+(index+1));
            // p.removeChild(p.firstChild); //기존 textNode제거
            // p.appendChild(content);//새로추가
            p.replaceChild(content,p.firstChild);//newNode,oldNode순으로 전달

        })
    };
값이 제대로 전달된 것을 확인할 수 있다. p5는 nextElementSibling을 두번 써서 진행했다.
값을 Hello1,2,3,4,5로 바꾸는 것은 약간 어려웠는데, forEach를 이용해서 p값과 index값을 정해 반복으로 진행했다.
replaceChild는 대체한다는 뜻이고 newNode / oldNode 순으로 전달한다.
parent.insertBefore(newNode, refNode)
    const test9=()=>{
        const mark=document.createElement("mark");
        mark.append(document.createTextNode("금요일이다!")); //mark.innerText="금요일이다~";

        // foo.insertBefore(mark,p3);
        p3.insertAdjacentElement('beforebegin',mark);
    };
target.insertAdjacentHTML (position, html);
- beforebegin 시작태그전(형제요소)
- afterbegin 시작태그직후(자식요소)
- beforeend 종료태그직전(자식요소)
- afterend 종료태그후 (형제요소)

    const test10=()=>{
        const html = "<mark>HTML</mark>";

        p3.insertAdjacentHTML('beforebegin',html);
        p3.insertAdjacentHTML('afterbegin',html);
        p3.insertAdjacentHTML('beforeend',html);
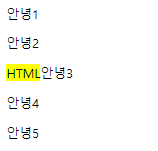
        p3.insertAdjacentHTML('afterend',html);
};순서대로 결과를 하나씩 보면

