Web Storage
웹서버에 많은 정보를 Client에 저장해 두는 것.
- localStorage 도메인별로 관리 . 직접 삭제하기 전까지 영구적으로 보관
- sessionStorage 도메인별로 관리. 접속한 동안만 데이터를 유지
Cookie와 다른점
- 크기에 제한이 없음 - cookie는 4KB , Web Storage는 제한이 없음.
- 서버로 보내지지 않음 - Cookie는 HTTP Request에 의해 자동으로 서버에 전송이 되지만 Web Storage는 전송되지 않음.
- 유효기간의 제한이 없음 - Cookie처럼 특정 기간이 지나면 자동으로 삭제되지 않음.
- JavaScript 객체를 저장할 수 있음
localStorage로 CRUD(Create Read Update Delete) 기능 만들기
1. Create
로컬 스토리지에 값 작성해서 넣기 : localStorage.setItem( 키값 , 밸류값 );
    <h2>CRUD</h2>
    <fieldset>
        <legend>Local Storage</legend>
        <input type="text" id="key" placeholder="key">
        <input type="text" id="value" placeholder="value">
        <hr>
        <button id="btn1">저장</button>
        <button id="btn2">조회</button>
        <button id="btn3">삭제</button>
        <button id="btn4">전체삭제</button>
</fieldset> btn1.onclick=()=>{
const keyVal=key.value;
const ValueVal=value.value;
//유효성검사
if(!keyVal || !ValueVal)return;
//저장 - 모두 문자열로 저장됨
localStorage.setItem(keyVal,ValueVal);
//초기화
key.value='';
value.value='';
};
key와 value를 입력했다.

Console 옆 Application의 Storage -> Local Storage에서 Key 값 = key, Value값 = value가 저장된 것을 볼 수 있다.
key에 개발자 , value에 춘딩 을 넣어보겠다.

이 역시 저장되었다.
2. Read
로컬 스토리지에서 값 가져오기 : localStorage.getItem(key.value);
    btn2.onclick=()=>{
        const keyVal=key.value;

        const value=localStorage.getItem(keyVal);
        console.log(typeof(value),value);//모두 문자열

        if(value){
            document.querySelector("#value").value=value;
        }
        else{
            alert(`${keyVal}에 해당하는 값이 없습니다.`);
            key.select();
        }
    };
개발자를 입력하고 조회를 누르면 value부분에 value값인 '춘딩' 이 나온다.


없는 값을 입력하면 다음과 같은 알림창이 나온다.
3. Delete
로컬스토리지에서 값 삭제하기 : localStorage.removeItem(key.value);
    btn3.onclick=()=>{
        const keyVal=key.value;

        //제거
        localStorage.removeItem(keyVal);

        //초기화
        key.value='';
        value.value='';
}없는 값을 key 박스에 입력하고 삭제를 누르면 아무 일도 일어나지 않는다.

개발자를 입력하고 삭제를 누르면, localStorage에서 삭제된 것을 확인할 수 있다.

4. Delete all
로컬 스토리지 전체 삭제 : localStorage.clear();
    btn4.onclick=()=>{
        localStorage.clear();
    };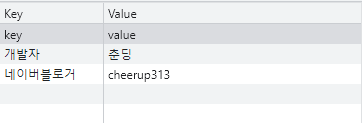
다음과 같은 값이 존재할 때, 전체삭제를 누르면 전부 없어진다.

localStorage에 객체와 배열저장
web storage에 저장되는 key/value는 모두 string타입이다.
- 배열, 객체를 그대로 저장하게 되면 toString 호출 결과를 저장한다. 즉, 데이터가 유실된다.
배열과 객체 JSON으로 변환 : JSON.stringify(배열명, 객체명)
JSON으로 변환한 객체 js(javascript)로 변환 : JSON.parse(localStorage.getItem("arr"))
<button id="btn5">실행</button>
    btn5.onclick=()=>{
        const arr=[1,2,3,['a','b','c']];
        const obj={
            id:123456,
            name:'애플토마토',
            expired : Date.now()+(1000*60),
            options : ['red','green','blue'],
            maker : {
                id: 'honggd'
            }
        };
        console.log(arr,obj);
        const arrJsonStr=JSON.stringify(arr);
        const objJsonStr=JSON.stringify(obj);
        console.log(typeof arrJsonStr,arrJsonStr);
        console.log(typeof objJsonStr,objJsonStr);

        //저장
        localStorage.setItem('arr',arrJsonStr);
        localStorage.setItem('obj',objJsonStr);

        //가져와서 js로 변환
        const arr2=JSON.parse(localStorage.getItem("arr"));
        console.log(typeof arr2,arr2);
        const obj2=JSON.parse(localStorage.getItem("obj"));
        console.log(typeof obj2, obj2);
    };

obj에 Object(객체)가 제대로 들어간 것을 확인할 수 있다.
방명록 만들기 (정보 저장 및 호출)
    <h2>방명록</h2>
    <form action="javascript:saveGuestbook();" name="guestbookFrm">
    <table>
        <tr>
        <th><label for="username">이름</label></th>
        <td><input type="text" id="username"></td>
        </tr>
        <tr>
        <th><label for="content">내용</label></th>
        <td><input type="text" id="content"></td>
        </tr>
        <tr>
        <td colspan="2" style="text-align: center;">
            <button>저장</button>
        </td>
        </tr>
    </table>
    </form>
    <table id="tb-guestbook">
    <thead>
        <tr>
        <th>No</th>
        <th>이름</th>
        <th>내용</th>
        <th>일시</th>
        </tr>
    </thead>
    <tbody></tbody>
    </table>
<script> <script>
class Guestbook {
constructor(username, content, datetime = Date.now()){
this.username = username;
this.content = content;
this.datetime = datetime;
}
}
/**
* 유효성검사
*/
document.guestbookFrm.onsubmit = () => {
if(!username.value || !content.value){
alert("이름과 내용을 작성해주세요");
return false;
}
};
/**
* 방명록 저장
* 사용자 입력값 -> guestbook객체 ->배열에 저장 ->json -> localStorage 저장
*/
const saveGuestbook =()=>{
// 사용자 입력값 처리
const usernameVal=username.value;
const contentVal=content.value;
//guestbook 객체
const guestbook = new Guestbook(usernameVal,contentVal);
//배열에 저장
const guestbooks=JSON.parse(localStorage.getItem("guestbooks")) || [];//null일경우 오른쪽에 값 담김
console.log(guestbook);
guestbooks.push(guestbook);
//json
const data=JSON.stringify(guestbooks);
console.log(data);
//localStorage에 저장
localStorage.setItem('guestbooks',data);
//초기화
document.guestbookFrm.reset();
//렌더링
renderGuestbook(guestbooks);
};
const renderGuestbook=(guestbooks)=>{
if(!guestbooks) return;
const tbody=document.querySelector("#tb-guestbook tbody");
tbody.innerHTML="";
guestbooks.map((guestbook,index)=>{ //행 한칸씩 추가
const {username,content,datetime}=guestbook;
return `<tr>
<td>${index+1}</td>
<td>${username}</td>
<td>${content}</td>
<td>${datetimeFormatter(datetime)}</td>
<tr>`;
}).forEach((tr)=>{
tbody.innerHTML+=tr;
});
}
const datetimeFormatter=(millis)=>{
const d=new Date(millis);
const f=(n)=>n<10?'0'+n:n;//무조건10의자리 만들기위해사용
const yyyy=d.getFullYear();
const mm=f(d.getMonth()+1);
const dd=f(d.getDate());
const hh=f(d.getHours());
const mi=f(d.getMinutes());
return `${yyyy}/${mm}/${dd} ${hh}:${mi}`;
}
</script>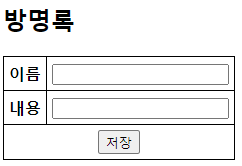
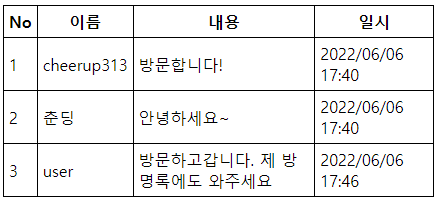
이름과 내용을 입력하면 다음과 같이 저장된다.

Application에서도 다음과 같이 내용을 볼 수 있다.
비동기처리
동기 (synchronous) | 비동기(asynchronous)
자바스크립트는 싱글쓰레드로 실행한다.
비동기처리함수(Timer API, DOM관련, 이벤트처리, Ajax요청) 호출시, 백그라운드에 처리를 위임한다.
동기함수의 모든 처리가 끝나면 (call stack이 비워지면) 실행된다.
heap = 객체 저장공간
call stack = 함수 실행 스택
Web APIs
Callback Queue
Event Loop
비동기 처리 함수 - Timer API
  <button id="btn1">Async - Timer</button>
  <button id="btn2">Async - DOM</button>
<button id="btn3">Async - DOM 연속</button> btn1.onclick = () => {
// 동기식처리
let result = foo();
console.log(result);
// 비동기식처리
let result2;
// Timer API 함수들은 호출과 동시에 background(Web APIs)에 처리를 위임한다.
setTimeout(() => {
result2 = 100;
console.log('result2 : ', result2); // 1. 코드위치 수정
}, 0);
};
const foo = () => {
console.log('foo');
return 100;
}

버튼 클릭과 동시에 result2 : 100이 돌아온다. (시간차를 두지 않음)
Timer API함수들은 호출과 동시에 background(Web API)에 처리를 위임한다.
비동기처리 - DOM관련, event 처리
const bar = () => {
  console.log("bar");
  return 'js/2.js';
};1.js 파일
const car = () => {
  console.log("car");
  return "js/3.js";
};2.js 파일
const dar = () => {
  console.log("dar");
};3.js 파일
  btn2.onclick = () => {
    // loadScript("js/1.js");
    // bar(); // Uncaught ReferenceError: bar is not defined

    loadScript("js/1.js", () => {
      console.log('load완료!');
      bar(); // bar
    });
  };

  // const loadScript = (path) => {
  //   const script = document.createElement('script');
  //   script.src = path;
  //   document.head.append(script); // 비동기처리
  // };

  const loadScript = (path, callback) => {
    const script = document.createElement('script');
    script.src = path;
    script.onload = callback; // 2. callback함수
    document.head.append(script); // 비동기처리하는부분. append되길 기다리지 않고 실행
  };
button 2 클릭시 다음과 같은 콘솔창을 볼 수 있다.
load완료 후 bar(1.js파일)를 호출하면 bar가 출력된다.
  /**
   * js/1.js 로드 - bar() 다음에 로드할 js의 주소값 리턴
   */
  btn3.onclick = () => {
    loadScript('js/1.js', () => {
      loadScript(bar(), () => {
        car();
      });
    });
  };
다음과 같이 실행할 경우, bar가 나온 다음에 car가 나온다.
1.js를 로드한 이유는 bar() 다음에 로드할 js의 주소값을 리턴하기 위함이다.
배경색 연속변경
  <button id="btn4">@실습문제 - 배경색 연속변경</button>
  <div class="bg-box"></div>
  <style>
  .bg-box {
    width: 100px;
    height: 100px;
    margin: 10px;
    border: 1px solid #000;
} btn4.onclick = () => {
const target = document.querySelector(".bg-box");
setTimeout(() => {
target.style.backgroundColor = "red";
setTimeout(() => {
target.style.backgroundColor = "green";
setTimeout(() => {
target.style.backgroundColor = "yellow";
setTimeout(() => {
target.style.backgroundColor = "blue";
setTimeout(() => {
target.style.backgroundColor = "pink";
}, 1000);
}, 1000);
}, 1000);
}, 1000);
}, 1000);
}클릭시 1초 단위로 색이 바뀌고, pink에서 멈추는 것을 확인할 수 있다.
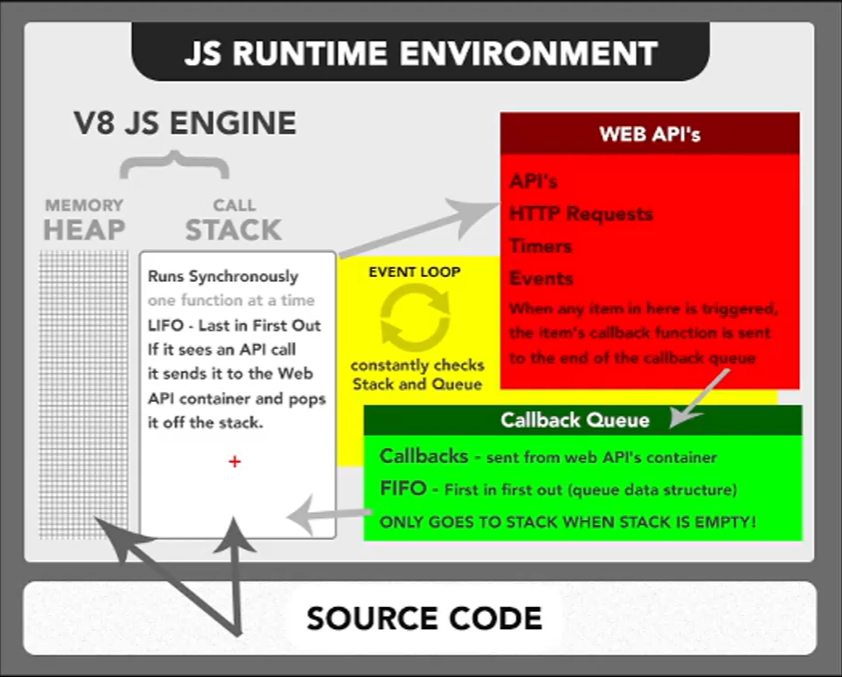
Call Stack & Heap -> WEB API's -> Callback Queue -> Call Stack & Heap 이벤트 발생 루프
여기서 실행하면 눈으로 코드가 실행되는 순서를 볼 수 있다.
callStack이 비면 비동기함수 실행 가능 (Callback Queue -> Call Stack)
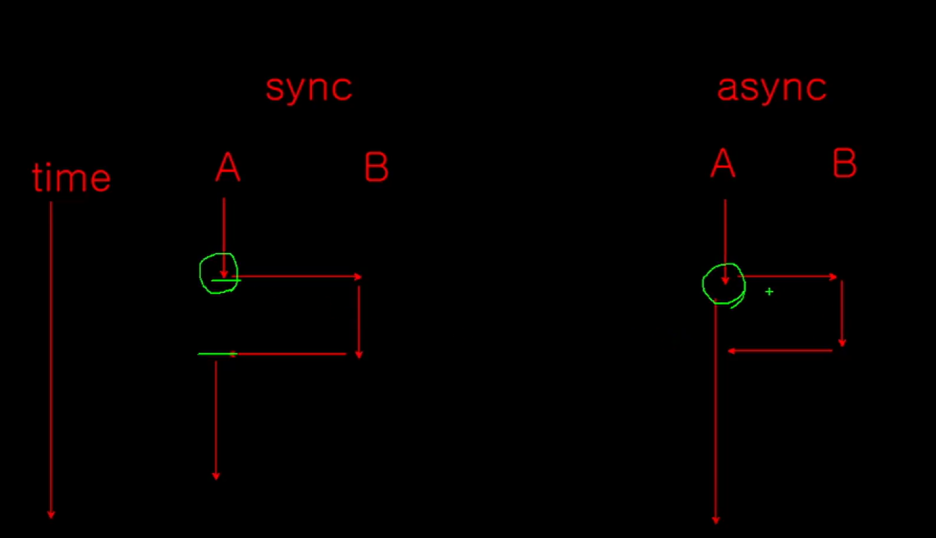
A에서 B를 신경쓰지않고 바로 실행되는것 = 비동기
